Continuous deployment environment with Docker, AWS EB and Codeship
In the previous part we set up a dedicated Symfony application on Docker virtual containers and prepared environments that may be transferred between developers during project cycle. The next step is to prepare the application for pushing into the cloud. There are many options available on the market – Heroku, DigitalOcean and, my favorite, AWS Elastic Beanstalk.
Setting up AWS Elastic Beanstalk instance.
First of all, we need to set up a new instance in AWS. To do so, we need to sign in or create a new account at https://www.amazon.com/ap/signin.

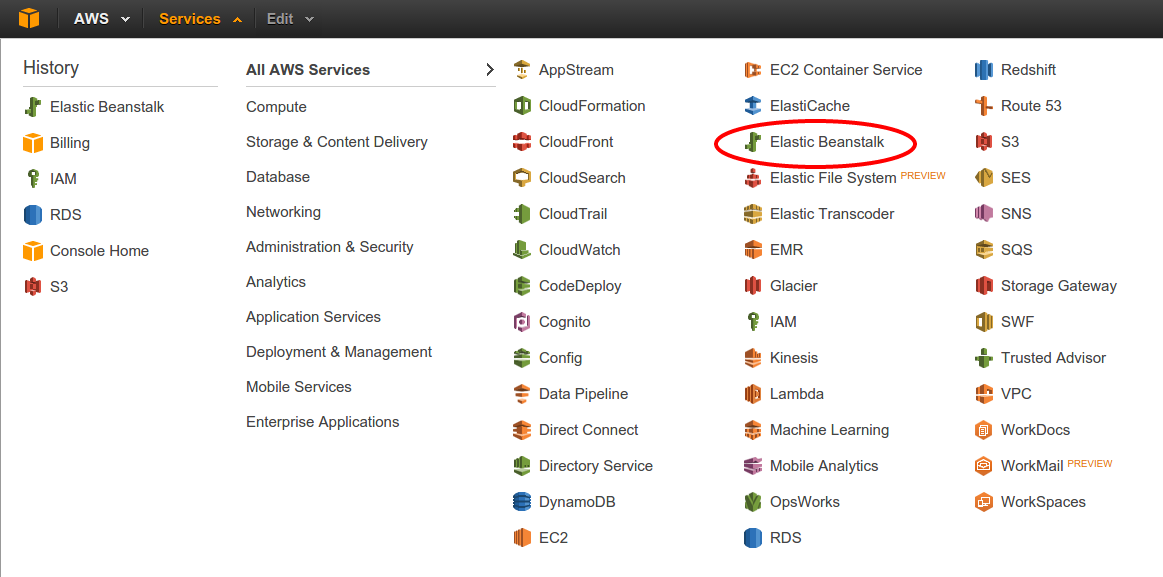
After successful login we can select the services from the top menu. Our interest is in Elastic Beanstalk, because it contains EC2 instance as a main server and RDS (Database server) as well as provides additional tools that really help to automate the deployment process.
After selecting the EB, there will appear a screen with list of applications and available environments. That’s what surprised me when I was starting with AWS EB. It allows you to create an application and define different environments – for developers, QA, acceptance and production etc. That is perfect. A little bit later we will see how to use them with github repository on different branches. But first, let’s configure a new application for our Symfony’s repository.
At first, we need to click “Create New Application” button in the top right corner and fill in the form. Type the application’s name and optional description. Before clicking “next” button please notice that in the top right corner there is a name of current datacenter. AWS has 9 of them in different parts of the world to ensure that you can deliver the content faster to the end-users. This name might be useful during further deployment.
When the application has already been defined, the AWS will ask us to create a very first environment. At the beginning, you can treat the environment as a normal server instance. There are several options available – PHP, Python, Ruby, Tomcat, Multi or Single-instance Docker environment. The latest is most interesting in our case. Then, choose a sample application as a source and enter your environment name and url.
After that, the wizard allows us to configure additional resources. Most of applications use MySQL database and so do we. This can be set up and configured automatically right now by selecting the option on your right.
The second option is responsible for creating a VPC – Virtual Private Cloud. It means that only allowed users will have an access to our servers.
Next, please fill in the RDS form. And choose size for the instance. Right now I recommend t1.medium for EC2 (the main server) and RDS, because AWS will set them faster up and all deployments will take less time. When the application will be fully configured and stable, the instance size can be changed to lower-priced t1.small.

Environment configuration variables
Imagine that there is not one environment, but at least 5 or more environments configured for one application. Or even one hundred in some really extreme cases. We would like to keep us out of any administration job, so we should automate as much as possible. Especially, configuration options like database host, username, password, some other credentials. Otherwise, we will need to put all of them into our application after each deploy with Docker or configure everything on server. Which is by the way a complete loss of precious time.
What AWS delivers is a Software Configuration tab in environment administration panel where all variables can be defined. Moreover, Symfony uses (with a little hack) all environment variables starting with SYMFONY__ prefix. The variable name will be cut by the prefix, lowercased and all double underscores will be replaced by a dot. Ex. SYMFONY__DATABASE__NAME will be visible in container’s parameter bag as a database.name. But, only when you hack the Symfony and Apache server following the two tricks described below.

TIP 1: Show Software Configuration in $_SERVER array
All options from Software Configuration will be available in $_SERVER array, or at least should be. The mod_env module from Apache server blocks all unregistered parameters and doesn’t pass them to the website. But when you run printenv the server will show all variables.
The mod_env allows to specify which variables can be passed to the website by using PassEnv option in VirtualHost configuration. In case where we use the phpmenthors Docker’s image there is a preconfigured file in /var/apache2/sites-enabled/000-default.conf which contains only one environment variable – APP_RUN_MODE. Some more options should be added there. Let’s see how the final file is expected to look like.
|
1
2
3
4
5
6
7
8
9
10
11
12
13
14
|
DocumentRoot “${APP_DOCUMENT_ROOT}“
<Directory “${APP_DOCUMENT_ROOT}“>
AllowOverride AuthConfig FileInfo Indexes Limit Options=All,MultiViews
Options FollowSymLinks MultiViews
Require all granted
CustomLog ${APACHE_LOG_DIR}/access.log combined
ErrorLog ${APACHE_LOG_DIR}/error.log
PassEnv APP_RUN_MODE
PassEnv SYMFONY__DATABASE_NAME
PassEnv SYMFONY__DATABASE_HOST
PassEnv SYMFONY__DATABASE_PASSWORD
PassEnv SYMFONY__DATABASE_USER
</Directory>
|
Main information about database credentials was added. But, the container has not been aware of additional options yet and it needs to be informed. I put this data into a project’s repository in docker/000-default.conf file and mount to the container from Dockerfile. The final Docker file should look like this:
|
1
2
3
4
5
6
7
8
9
10
11
|
FROM phpmentors/symfony-app:php55
MAINTAINER Piotr Pasich < [email protected]>
EXPOSE 80
WORKDIR /var/app
ADD . /var/app
#added configuration file to pass environment variables
ADD docker/000-default.conf /etc/apache2/sites-available/000-default.conf
RUN /bin/bash /var/app/app/setup
|
Still, this won’t work and the application won’t see those variables. We need a second tip.
TIP 2: Hacking Symfony and overwrite parameters.yml configuration
Symfony’s documentation states that all variables with a SYMFONY__ prefix will be shared in container’s parameters bag. However, if there is a parameter with the same name in parameters.yml file it will be overwritten, which is not an expected behavior. This issue is well described at github https://github.com/symfony/symfony/issues/7555.
Benjamin Eberlei (beberlei) has proposed a quick hack of this. In app/AppKernel.php file put a method which will overwrite the parameter’s bag once again by environments variables:
|
1
2
3
4
5
6
7
8
9
|
public function registerContainerConfiguration(LoaderInterface $loader)
{
$loader->load(__DIR__.‘/config/config_’.$this->getEnvironment().‘.yml’);
$envParameters = $this->getEnvParameters();
$loader->load(function($container) use($envParameters) {
$container->getParameterBag()->add($envParameters);
});
}
|
Now, the application should read variables directly from AWS Software Configuration.
Configuring application
The AWS EB instance is setting up right now. This process will take about 30 minutes, so we have time to take care of the application’s configuration. In previous part of the series two configuration files were created to manage the Docker environment – Dockerfile, responsible for the main container configuration, and docker-compose.yml, responsible for setting up all containers necessary to run complete environment. Unfortunately, the AWS EB requires one more file – the Dockerrun.aws.json which defines the most important information about application for AWS EB.
The simplest example of this file describes only an API version and exposed port.
|
1
2
3
4
5
6
7
8
|
{
“AWSEBDockerrunVersion”: “1”,
“Ports”: [
{
“ContainerPort”: “80”
}
]
}
|
With default configuration, the AWS EB instance will run docker build . command. In more advanced cases the image, logging services and mounted volumes can be specified. More information can be obtained at official dockerrun.aws.json file documentation http://docs.aws.amazon.com/elasticbeanstalk/latest/dg/create_deploy_docker_image.html.
Preparing EB command
The application is now ready to be deployed. However, we still need a way to complete that task. AWS EB delivers a command line interface (CLI) – the eb. The official documentation shows how to install the CLI from pip repository.
|
1
2
3
4
|
sudo apt-get install python-pip python-dev build-essential
pip install awsebcli
pip install –upgrade awsebcli
eb –version
|
This command allows to operate, configure, login and check the EB instances. Let’s connect it with the application. All following actions need to be executed in the main application’s folder.
Start with eb init which starts a wizard where the datacenter (Oregon in our case), application and environment can be selected. All details are stored in .elasticbeanstalk folder, but the environment depends on the branch which you are using. At first, it might be a little bit confusing when EB asks you to choose an environment after switching between branches. But in fact, this is quite clever solution. A master branch can be assigned to production environment, develop branch to dev environment and test to QA. There is no need to remember all relations and no worries that somebody will deploy the code to wrong environment.
Working with EB CLI
The EB CLI has a couple of useful commands. The very first is eb deploy which gets current branch from the git and uploads to the EB instance. Then runs a script which builds the Docker container from Dockerfile and configures the application.
If something went wrong there is eb logs option to show a snapshot from most important log files like eb-activity, Docker, Apache etc. Only last hundred of records from each file is presented.
From time to time there is a need to check what is inside the instance. To do so, use the eb ssh which will open a ssh command line. Remember to login to the Docker container (like in previous episode) by docker ps and docker exec -it bash.
The frosting on the cake – coming soon
After the second part of the course we almost accomplished to set up the automated deployment process. However, at this point it still requires some manual actions from developer’s side, for instance running the eb deploy. The biggest companies in the world like facebook, google or yahoo are proud about having at least a couple of hundreds deploys per day. That’s a huge number and cannot be achieved manually. So, next time I’ll show you how to fully automate the process. Stay tuned.
The top image is downloaded from http://www.hdwallz.com/wallpaper/2235
Continuous deployment environment with Docker, AWS EB and Codeship
In the previous part we set up a dedicated Symfony application on Docker virtual containers and prepared environments that may be transferred between developers during project cycle. The next step is to prepare the application for pushing into the cloud. There are many options available on the market – Heroku, DigitalOcean and, my favorite, AWS Elastic Beanstalk.
Setting up AWS Elastic Beanstalk instance.
First of all, we need to set up a new instance in AWS. To do so, we need to sign in or create a new account at https://www.amazon.com/ap/signin.
After successful login we can select the services from the top menu. Our interest is in Elastic Beanstalk, because it contains EC2 instance as a main server and RDS (Database server) as well as provides additional tools that really help to automate the deployment process.
After selecting the EB, there will appear a screen with list of applications and available environments. That’s what surprised me when I was starting with AWS EB. It allows you to create an application and define different environments – for developers, QA, acceptance and production etc. That is perfect. A little bit later we will see how to use them with github repository on different branches. But first, let’s configure a new application for our Symfony’s repository.
At first, we need to click “Create New Application” button in the top right corner and fill in the form. Type the application’s name and optional description. Before clicking “next” button please notice that in the top right corner there is a name of current datacenter. AWS has 9 of them in different parts of the world to ensure that you can deliver the content faster to the end-users. This name might be useful during further deployment.
When the application has already been defined, the AWS will ask us to create a very first environment. At the beginning, you can treat the environment as a normal server instance. There are several options available – PHP, Python, Ruby, Tomcat, Multi or Single-instance Docker environment. The latest is most interesting in our case. Then, choose a sample application as a source and enter your environment name and url.
After that, the wizard allows us to configure additional resources. Most of applications use MySQL database and so do we. This can be set up and configured automatically right now by selecting the option on your right.
The second option is responsible for creating a VPC – Virtual Private Cloud. It means that only allowed users will have an access to our servers.
Next, please fill in the RDS form. And choose size for the instance. Right now I recommend t1.medium for EC2 (the main server) and RDS, because AWS will set them faster up and all deployments will take less time. When the application will be fully configured and stable, the instance size can be changed to lower-priced t1.small.
Environment configuration variables
Imagine that there is not one environment, but at least 5 or more environments configured for one application. Or even one hundred in some really extreme cases. We would like to keep us out of any administration job, so we should automate as much as possible. Especially, configuration options like database host, username, password, some other credentials. Otherwise, we will need to put all of them into our application after each deploy with Docker or configure everything on server. Which is by the way a complete loss of precious time.
What AWS delivers is a Software Configuration tab in environment administration panel where all variables can be defined. Moreover, Symfony uses (with a little hack) all environment variables starting with SYMFONY__ prefix. The variable name will be cut by the prefix, lowercased and all double underscores will be replaced by a dot. Ex. SYMFONY__DATABASE__NAME will be visible in container’s parameter bag as a database.name. But, only when you hack the Symfony and Apache server following the two tricks described below.
TIP 1: Show Software Configuration in $_SERVER array
All options from Software Configuration will be available in $_SERVER array, or at least should be. The mod_env module from Apache server blocks all unregistered parameters and doesn’t pass them to the website. But when you run printenv the server will show all variables.
The mod_env allows to specify which variables can be passed to the website by using PassEnv option in VirtualHost configuration. In case where we use the phpmenthors Docker’s image there is a preconfigured file in /var/apache2/sites-enabled/000-default.conf which contains only one environment variable – APP_RUN_MODE. Some more options should be added there. Let’s see how the final file is expected to look like.
|
1
2
3
4
5
6
7
8
9
10
11
12
13
14
|
DocumentRoot “${APP_DOCUMENT_ROOT}“
<Directory “${APP_DOCUMENT_ROOT}“>
AllowOverride AuthConfig FileInfo Indexes Limit Options=All,MultiViews
Options FollowSymLinks MultiViews
Require all granted
CustomLog ${APACHE_LOG_DIR}/access.log combined
ErrorLog ${APACHE_LOG_DIR}/error.log
PassEnv APP_RUN_MODE
PassEnv SYMFONY__DATABASE_NAME
PassEnv SYMFONY__DATABASE_HOST
PassEnv SYMFONY__DATABASE_PASSWORD
PassEnv SYMFONY__DATABASE_USER
</Directory>
|
Main information about database credentials was added. But, the container has not been aware of additional options yet and it needs to be informed. I put this data into a project’s repository in docker/000-default.conf file and mount to the container from Dockerfile. The final Docker file should look like this:
|
1
2
3
4
5
6
7
8
9
10
11
|
FROM phpmentors/symfony-app:php55
MAINTAINER Piotr Pasich < [email protected]>
EXPOSE 80
WORKDIR /var/app
ADD . /var/app
#added configuration file to pass environment variables
ADD docker/000-default.conf /etc/apache2/sites-available/000-default.conf
RUN /bin/bash /var/app/app/setup
|
Still, this won’t work and the application won’t see those variables. We need a second tip.
TIP 2: Hacking Symfony and overwrite parameters.yml configuration
Symfony’s documentation states that all variables with a SYMFONY__ prefix will be shared in container’s parameters bag. However, if there is a parameter with the same name in parameters.yml file it will be overwritten, which is not an expected behavior. This issue is well described at github https://github.com/symfony/symfony/issues/7555.
Benjamin Eberlei (beberlei) has proposed a quick hack of this. In app/AppKernel.php file put a method which will overwrite the parameter’s bag once again by environments variables:
|
1
2
3
4
5
6
7
8
9
|
public function registerContainerConfiguration(LoaderInterface $loader)
{
$loader->load(__DIR__.‘/config/config_’.$this->getEnvironment().‘.yml’);
$envParameters = $this->getEnvParameters();
$loader->load(function($container) use($envParameters) {
$container->getParameterBag()->add($envParameters);
});
}
|
Now, the application should read variables directly from AWS Software Configuration.
Configuring application
The AWS EB instance is setting up right now. This process will take about 30 minutes, so we have time to take care of the application’s configuration. In previous part of the series two configuration files were created to manage the Docker environment – Dockerfile, responsible for the main container configuration, and docker-compose.yml, responsible for setting up all containers necessary to run complete environment. Unfortunately, the AWS EB requires one more file – the Dockerrun.aws.json which defines the most important information about application for AWS EB.
The simplest example of this file describes only an API version and exposed port.
|
1
2
3
4
5
6
7
8
|
{
“AWSEBDockerrunVersion”: “1”,
“Ports”: [
{
“ContainerPort”: “80”
}
]
}
|
With default configuration, the AWS EB instance will run docker build . command. In more advanced cases the image, logging services and mounted volumes can be specified. More information can be obtained at official dockerrun.aws.json file documentation http://docs.aws.amazon.com/elasticbeanstalk/latest/dg/create_deploy_docker_image.html.
Preparing EB command
The application is now ready to be deployed. However, we still need a way to complete that task. AWS EB delivers a command line interface (CLI) – the eb. The official documentation shows how to install the CLI from pip repository.
|
1
2
3
4
|
sudo apt-get install python-pip python-dev build-essential
pip install awsebcli
pip install –upgrade awsebcli
eb –version
|
This command allows to operate, configure, login and check the EB instances. Let’s connect it with the application. All following actions need to be executed in the main application’s folder.
Start with eb init which starts a wizard where the datacenter (Oregon in our case), application and environment can be selected. All details are stored in .elasticbeanstalk folder, but the environment depends on the branch which you are using. At first, it might be a little bit confusing when EB asks you to choose an environment after switching between branches. But in fact, this is quite clever solution. A master branch can be assigned to production environment, develop branch to dev environment and test to QA. There is no need to remember all relations and no worries that somebody will deploy the code to wrong environment.
Working with EB CLI
The EB CLI has a couple of useful commands. The very first is eb deploy which gets current branch from the git and uploads to the EB instance. Then runs a script which builds the Docker container from Dockerfile and configures the application.
If something went wrong there is eb logs option to show a snapshot from most important log files like eb-activity, Docker, Apache etc. Only last hundred of records from each file is presented.
From time to time there is a need to check what is inside the instance. To do so, use the eb ssh which will open a ssh command line. Remember to login to the Docker container (like in previous episode) by docker ps and docker exec -it bash.
The frosting on the cake – coming soon
After the second part of the course we almost accomplished to set up the automated deployment process. However, at this point it still requires some manual actions from developer’s side, for instance running the eb deploy. The biggest companies in the world like facebook, google or yahoo are proud about having at least a couple of hundreds deploys per day. That’s a huge number and cannot be achieved manually. So, next time I’ll show you how to fully automate the process. Stay tuned.
The top image is downloaded from http://www.hdwallz.com/wallpaper/2235
 Psst! Do you accept cookies?
What's your thoughts?
Please Register or Login to your account to be able to submit your comment.