 Psst! Do you accept cookies?
Paying for goods with Bitcoin is becoming more and more popular. If you run, maintain or develop an e-commerce website, ICO project, exchange, or trading system, you may be interested in a quick way of integrating with the Bitcoin blockchain.
This article will show one of many ways of installing a Bitcoin mining software and integrating a PHP application with it. I will present how to generate an address for your users and check if the transactions are confirmed.
Why should I integrate with Bitcoin?
Some say that getting paid with Bitcoin should be treated like an investment process. Because, Bitcoin value grows every day, if somebody transfers to you $100 in Bitcoins today, it may be worth $110 tomorrow. Sounds great, huh?
Believe it or not, Bitcoin is more popular every day. Just like PayPal 17 years ago. This may sound crazy, but the voices are quite similar — “it is not real money”, “nobody will pay for that”, or “I do not trust this”.
However, there are a couple of factors that may convince you that it is worth the work you put into it:
- Bitcoin is gaining significant popularity
- Bitcoin value has been growing for some time
- You do not pay fees
- Most of the security is client-side
- You decide how the client will pay
- You do not depend on any third party organizations
What I would like to show you in this article
After reading this article you will know how to setup own Bitcoin Network, open wallets, mine Bitcoins, check wallet balance, make and confirm transfers from the blockchain.
Integration with the Bitcoin blockchain differs from any API-integration I have ever worked with. You get raw data and need to know how to operate on it. To do so, you need to understand how the blockchain or Bitcoin works (see The Blockchain fundamentals for developers).
I would like to show you how to install a simple Bitcoin client, start a test environment and integrate a simple e-commerce website with the blockchain. Our goal will be to go through a payment process where your potential client has already added some goods to the basket, entered a shipment method and selected the Bitcoin payment method. That is the point where we will start.
Bitcoin Nodes

Bitcoin can be described as a protocol for peer-to-peer communication with some rules that keep the blockchain immutable. That gives a lot of space for developing new client and mining software. Several daemons that communicate with the Bitcoin network are available on the Internet — the Bitcore, the Btcd, the Bcoin, and many others.
Bitcore
A powerful, modular node for bitcoin and blockchain-based apps. A fully integrated node that delivers additional features like additional indexes for querying address balances, unspent outputs, and the transaction history. (https://bitcore.io/)
Bcoin
This node provides even more extra features and built-in accounting and wallet tools than the Bitcore. Its creators focused on reducing the complexity and building a scalable infrastructure. (http://bcoin.io/)
Btcd
It downloads, validates, and serves the bitcoin blockchain under the same ruleset as Bitcore, but all features related to the wallet, like transferring, receiving or managing funds, have been excluded. Those features can be handled by an additional piece of software called btcwallet (https://github.com/btcsuite/btcd)
The daemons differ from each other like MySql and PostreSQL – there are some differences, but the major principle is preserved.
Btcd
For our example, I chose the btcd node because it keeps the wallet and blockchain functionalities separated. This approach brings a little bit more complexity to the project but also isolates the writing and reading methods.
Installation
Because almost all servers I have ever worked with ran one of the Linux distributions, I will stick to Linux (Ubuntu preferred). Information on how to install btcd or btcwallet on other systems can be found in their official GitHub repositories — https://github.com/btcsuite/btcd.
GO(golang)
The btcd requires GO(golang) version 1.8 or newer. The older versions will cause problems with missing external libraries, so if you face issues like that, please check the GO version which is installed on your computer.
|
1
2 3 |
sudo curl -O https://storage.googleapis.com/golang/go1.8.linux-amd64.tar.gz
sudo tar -xvf go1.8.linux-amd64.tar.gz sudo mv go /usr/local |
export PATH=$PATH:/usr/local/go/bin
export GOROOT=$HOME/go
export PATH=$PATH:$GOROOT/bin
export GOPATH=$HOME/projects/go/
The last line export GOPATH=$HOME/projects/btcd points to the directory where you will pull the btcd repository in the next step. I like to keep all my projects in the $HOME/projects directory, so I will change that to export GOPATH=$HOME/projects/btcd
BTCD
All steps for various Linux distributions or other operating systems can be found at the official GitHub repository – https://github.com/btcsuite/btcd
|
1
2 3 4 5 |
go get -u github.com/Masterminds/glide
git clone https://github.com/btcsuite/btcd $GOPATH/src/github.com/btcsuite/btcd cd $GOPATH/src/github.com/btcsuite/btcd glide install go install . ./cmd/… |
Because we set the $GOPATH as $HOME/projects/go/, we can expect that the btcd will be installed in the $HOME/projects/go/src/github.com/btcsuite/btcd or if somebody prefers ~/projects/go/src/github.com/btcsuite/btcd
The btcd application and other utilities will be installed in the bin directory – ~/projects/go/src/github.com/btcsuite/btcd/bin/. To be honest, I think that the bin directory can be copied to some other, more convenient place, and the GO repository can be removed because the executive files have been already compiled and can work without the code.
Btcwallet
As I mentioned at the beginning, the btcd is designed only to get the blockchain information. To get information about transfers and receive payments in the example e-commerce website, we need to install a tool that is called btcwallet (https://github.com/btcsuite/btcwallet).
|
1
2 3 4 |
git clone https://github.com/btcsuite/btcwallet $GOPATH/src/github.com/btcsuite/btcwallet
cd $GOPATH/src/github.com/btcsuite/btcwallet glide install go install . ./cmd/... |
As with the btcd case, the utilities for btcwallet will be installed in the ~/projects/go/src/github.com/btcsuite/btcwallet directory and can be moved or copied elsewhere. I prefer to keep it in the same folder with the btcd on my local machine, but separately in any other environment.
Running a Test Environment
During the development process, we do not want to spend or, in the worst case, lose real money. This is why most of the Bitcoin nodes has a couple of modes that you can run. All of them have different purposes and may help you with something else.
Be careful which mode you use. If you transfer Bitcoins from the MainNet address to TestNet address you will lose them. It is your responsibility to check everything twice and your punishment if something goes wrong.
MainNet
The MainNet is used as a general system purposed to collect and exchange Bitcoins between users. If you connect to the MainNet, the node will firstly download about 140 Gb of data from the blockchain. You will be able to integrate with Bitcoin only when the blockchain is up to date.
This is the primary mode that the node can be run in. It will connect you to the blockchain with real money.
TestNet
The TestNet is a mode dedicated to tests, and Bitcoins stored there have no value. Moreover, it was reset two times before, because people started to exchange Bitcoins from the TestNet for traditional currency. Coins stored there cannot be treated as currency.
The TestNet is less popular than the MainNet and has fewer transactions, typically smaller in size. The full blockchain is approximately 10Gb and new blocks can be mined by anybody across the internet.
Since TestNet and MainNet use different addresses (starting with 0x6F rather than 0x00), they are incompatible with one another; you cannot send TestNet Bitcoins to a normal Bitcoin address.
SimNet
The SimNet is a mode that I find really useful at the beginning of the development. It is a simulation mode. The node does not communicate with other nodes and has the only copy of its own blockchain. You have a full control of all actions — you decide when new blocks will be mined, transactions added to the block and confirmed.
If the node is run with the SimNet, it creates new blockchain, so no data download is needed. The SimNet is fast during development because there is no need to wait until a new block is mined.
Running the SimNet

During development, we do not want to wait for the blocks to be mined, so I decided to use the SimNet.
To properly simulate the behavior of the MainNet, you need to understand how the addresses are connected with the accounts really well. If all addresses are assigned to only one account, your Bitcoin balance will grow really fast every time you mine a new block and all transfers will be done between your addresses.
Just imagine a wallet with many compartments. The wallet is something really personal and everybody has one (or more than one). The wallet is similar to an account, and the compartments are addresses. In the MainNet, if you make a transaction, money will be transferred from one compartment in the first wallet to another compartment in the second wallet. You want to simulate this behavior in the TestNet, so you need to create many wallets (accounts). Otherwise, the money will be moved from one compartment to another, but it will still stay in the same wallet; and with every transaction, somebody will add 25 BTC to your wallet. I must admit that sounds beautiful in real life and awful when you need to test transferring funds.
Start btcd
We will run the btcd in SimNet mode for development use. The simulation mode runs a new network immediately, without downloading any additional data from the internet. If you would like to run the MainNet and get full information about the current blockchain, the –simnet flag should be removed.
The following command will start the Bitcoin Daemon with a provided username and password that we are going to use to authenticate our application. Btcd provides all the information about the blockchain.
|
1
|
../btcd --simnet --rpcuser=myuser --rpcpass=SomeDecentp4ssw0rd
|

The btcd will generate the block 0 and create all necessary files to start operating with the blockchain.
Run the Btcwallet
The btcwallet application is responsible for all operations, like transferring funds or getting the wallet balance. We use the same credentials as we put in btcd. But, before we run it, we need to generate new wallet that we will operate on.
|
1
|
./btcwallet -u myuser -P SomeDecentp4ssw0rd --simnet --create
|
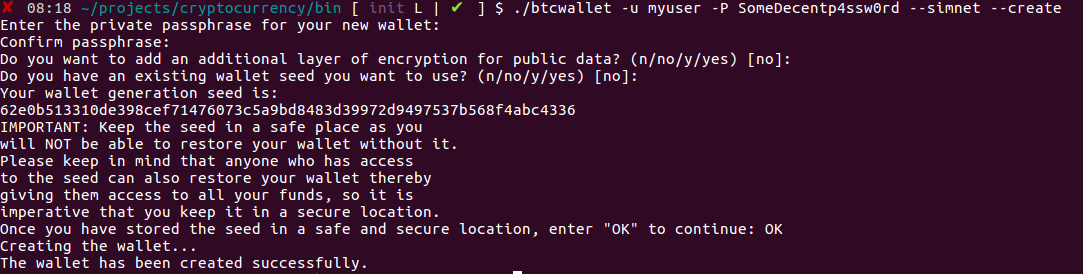
Please remember the passphrase you used to secure the wallet. We will use it quite often to unlock the wallet before every transaction.
Now we are able to start the btcwallet daemon:
|
1
|
./btcwallet -u myuser -P SomeDecentp4ssw0rd --simnet
|

Unlocking the Wallet
A method walletpassphrase unlocks the wallet for a specific period of time. In our case, it will be 600 seconds (10 minutes). The method requires two arguments to be passed — the first is the passphrase which was set when we created the wallet (I entered test as the passphrase) and the second one is the number of seconds the wallet will stay open.
|
1
|
./btcctl --rpcuser=myuser --rpcpass=SomeDecentp4ssw0rd --wallet --simnet walletpassphrase "test" 600
|
This action should be performed every time when the system asks us for authorization. The method does not return any success message, so if there is no error or exception presented, we can assume that the wallet is unlocked.
Generate Accounts
|
1
|
./btcctl --rpcuser=myuser --rpcpass=SomeDecentp4ssw0rd --simnet --wallet createnewaccount account1
|

Generating Bitcoins
To make any transaction in the SimNet, we need to generate some Bitcoins first. We can do it by creating a mining address where all new Bitcoins will be assigned after a new block is successfully mined or by manually adding some number of Bitcoins to a specific address (SimNet allows us to do it).
To create a mining address, we need to create a new address for the selected account (I will use the default one)
|
1
|
./btcctl --rpcuser=myuser --rpcpass=SomeDecentp4ssw0rd --simnet --wallet getnewaddress
|
This method will return a new address. It should be copied. The next step is to restart the btcd daemon and pass new argument — miningaddr which will tell the daemon where new coins should be sent after mining process:
|
1
|
./btcd --simnet --rpcuser=myuser --rpcpass=SomeDecentp4ssw0rd --miningaddr=SVv2gHztnPJa2YU7J4SjkiBMXcTvnDWxgM
|
Now we can generate some Bitcoins to prepare the system for first transactions. We can do that by generating and approving new blocks with the command generate, which accepts an additional argument with the number of blocks that should be generated.
|
1
|
./btcctl --simnet --wallet --rpcuser=myuser --rpcpass=SomeDecentp4ssw0rd generate 21
|
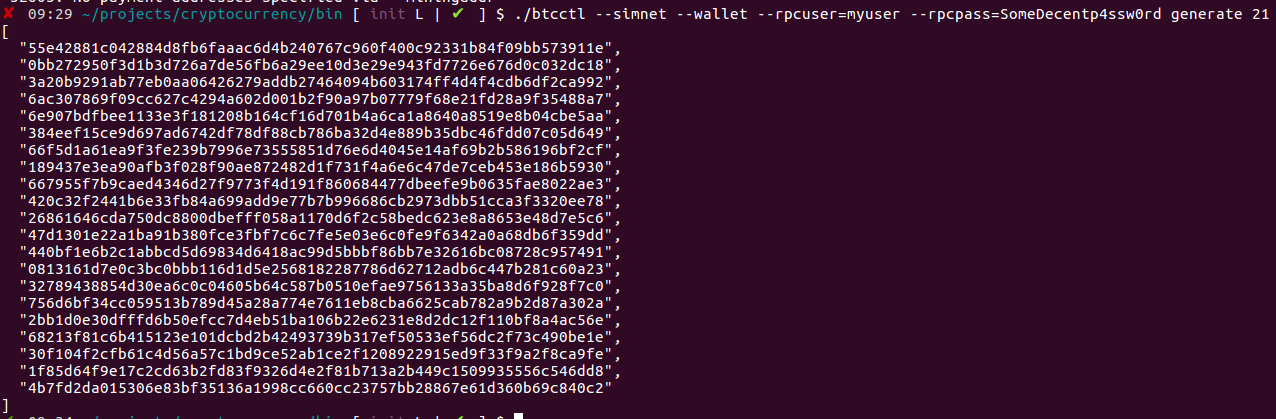
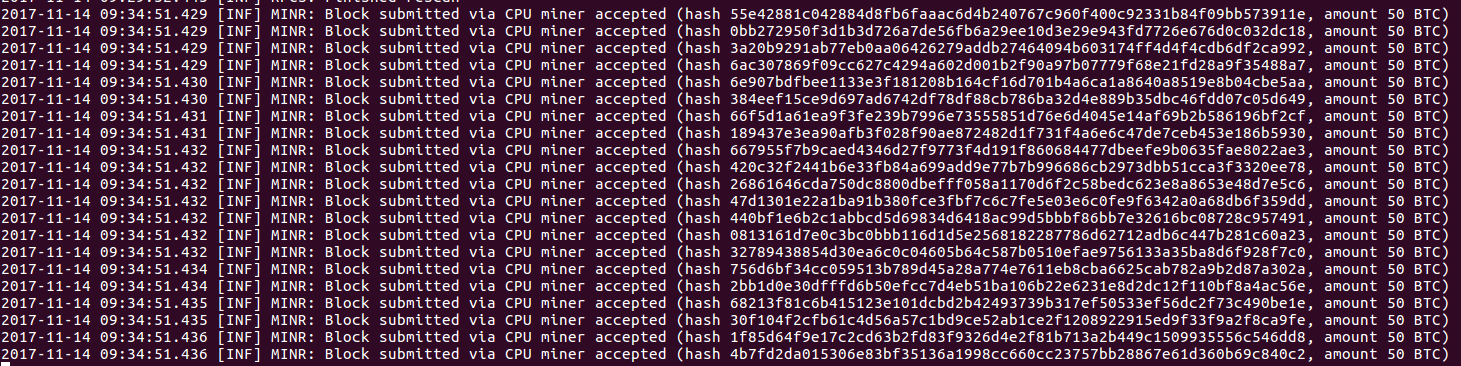
Meanwhile, the btcd will log messages that 21 blocks have been submitted and successfully mined. 50 BTC per block were transferred to the selected address that we put into the miningaddr argument.
The Goal — Generate a Transaction
I would like to present one of the possibilities of how to use Bitcoin as a payment system. Let us assume that we want to add a new payment method to an already existing e-commerce website. Because Bitcoin is open-source software and fully free, we would like to avoid using any third party systems and set up the whole payment method on our own infrastructure. We already have the btcd and the btcwallet working; now we need to establish the payment process.

- Request transaction — When the user added some stuff to their basket, filled the shipment form, and chose the Bitcoin payment, we create a unique address for them. This address is assigned to our account so that all Bitcoin will be received by this account, but the application will be able to recognize the sender. Bitcoin does not support features such as the transfer title or the sender name. That is why we need to generate new address for every new payment. This address should be saved in the system’s database.
- Payment — the user makes a Bitcoin transfer. They send the funds to the address presented by the application.
- Get the Transaction — The application listened to the blockchain and watches if any new block is mined. If a new block appears in the blockchain, the application downloads a list of transactions mined in the block and compares the receivers’ addresses with the database. If an address match, we can register the payment.
Of course, the amount of funds can be different from the expected, but that is another case to handle, not strictly related to the integration with the Bitcoin network. - Get the Confirmations — When the transaction is mined, it has 1 confirmation. This may be not enough to mark it as trusted. I recommend the following approach:
- 1 confirmation for transactions from trusted sources under some minimum value (like $100).
- 3 confirmations for any average transaction like buying clothes or accessories on the Internet.
- 6 confirmations for investments, bigger shopping, or transactions from unverified sources.
The reason why we should accept a different number of confirmations is to balance the ratio of waiting time for a transaction’s approval and the trust for the sender. Because every new block is mined in approximately 10 minutes, every confirmation is added after another 10 minutes. So, 1 confirmation requires 1 block — 10 minutes, and 6 confirmations require more than one hour of waiting for a full approval process.
Generate a new address
When the user starts a payment process with Bitcoin, a new address should be generated for them. We can recognize the purpose of the transaction by this address. No transaction title is required.
The getnewaddress method creates a new address which is assigned to the specific account. This method allows for one optional parameter, which is the name of the account we would like to use for the new address. If this argument is not provided, a default account will be used.
As a result, the method will return a string which should be used for the transaction. This address should be copy-pasted, not rewritten, because Bitcoin approves all addresses and does not return any exception message like “This address does not exist” when you make a transaction to the wrong or non-existing address. Any mistake here can be pretty painful.
|
1
|
./btcctl --rpcuser=myuser --rpcpass=SomeDecentp4ssw0rd --simnet --wallet getnewaddress account1
|

Send a transaction from address to address
Let us switch to the user’s point-of-view for a moment. Now they are able to make a payment to the address that the application provided. I would like to present the simplest way to achieve that, but every transaction can be generated and published in a couple of different ways — especially when you use the raw transaction methods.
We are going to use the sendtoaddress method, which requires unlocking the wallet, the receiver address, and the number of Bitcoins that we would like to send. We will send 21 BTC to the SginxAsVTbqEzhXxYk2NvPLj5Qp61CjUkA address, which I created for the acocunt1 account.
|
1
|
./btcctl --rpcuser=myuser --rpcpass=SomeDecentp4ssw0rd --wallet --simnet sendtoaddress "SginxAsVTbqEzhXxYk2NvPLj5Qp61CjUkA" 21
|

Mine the transaction
Now, the transaction is created but not added to the blockchain, which means, the funds were not transferred yet. The transaction needs to be mined. To do so, we can use the generate method, like before. We will generate only one block, which should contain our transaction inside.
|
1
|
./btcctl --simnet --wallet --rpcuser=myuser --rpcpass=SomeDecentp4ssw0rd generate 1
|

The btcd claims that, this time, not 50 BTC were mined with the block, but 50.00000227 BTC. The difference is the fee added with the one transaction that the block contains.
![]()
Get Wallet Balance
We can check the balance for both accounts — default and account1 by using the getbalance method:
|
1
|
./btcctl --simnet --wallet --rpcuser=myuser --rpcpass=SomeDecentp4ssw0rd getbalance
|

Get the last block information
As you can see, Bitcoins were transferred successfully, but we cannot say anything about the transaction. That is why we need to check the list of transactions that were added to the last block. We can do that by calling the getblock method, which returns information about the block with transaction ids included.
This method gets only one argument which is the block hash. This can be copied from the btcd log for now:
|
1
|
./btcctl --simnet --wallet --rpcuser=myuser --rpcpass=SomeDecentp4ssw0rd getblock 6f72f0c0d0bfeb0a8d18c6ce37bdaca189b13d33d6545facc2098c27b54855c4
|

Ordinarily, we will not have the block hash number available in the application. We should get it from another source. Because the blocks are placed in very specific order, I prefer to use the id of the block instead of the hash.
We have generated about 30 blocks so far, so we can use ids like 0, 1, 2, 3,… 30 so far. The block’s hash can be retrieved by the method getblockhash:
|
1
|
./btcctl --simnet --wallet --rpcuser=myuser --rpcpass=SomeDecentp4ssw0rd getblockhash 30
|
![]()
I usually save the number of a block that I investigated last time, increase it by one and iterate the process. With this workflow, I am sure that the system did not omit any block as it can happen with the getblocksince method.
Get information about transactions inside the block
This is the part that I do not like very much in the btcd API. The getblock method returns only the ids of transactions with no additional information. As I mentioned before, we need the receiver address for each transaction which we can compare with our database.
To get this information, we need to iterate over the tx array inside the block and call gettransaction method with every id. In our case we will have 2 transactions — one transaction done manually by us and the second one from our wallet to the miner address with the fee for mining the transaction.
To get detailed information about the transaction, we can use gettransaction method:
|
1
|
./btcctl --simnet --wallet --rpcuser=myuser --rpcpass=SomeDecentp4ssw0rd gettransaction eefdcfb9f6e36bc52b07af293f20b41633a03deb22117bb628dbcdd13122d6a2
|

In details, we can see that the address we were looking for is added in the category receive. So the funds are transferred.
Confirm the Transaction
As you can see, the confirmation number is 1 so far. This means that the transaction was confirmed only by one miner. To get more confirmations, we need to generate more blocks by calling the generate method. We will generate 10 new blocks to receive a total of 11 confirmations:
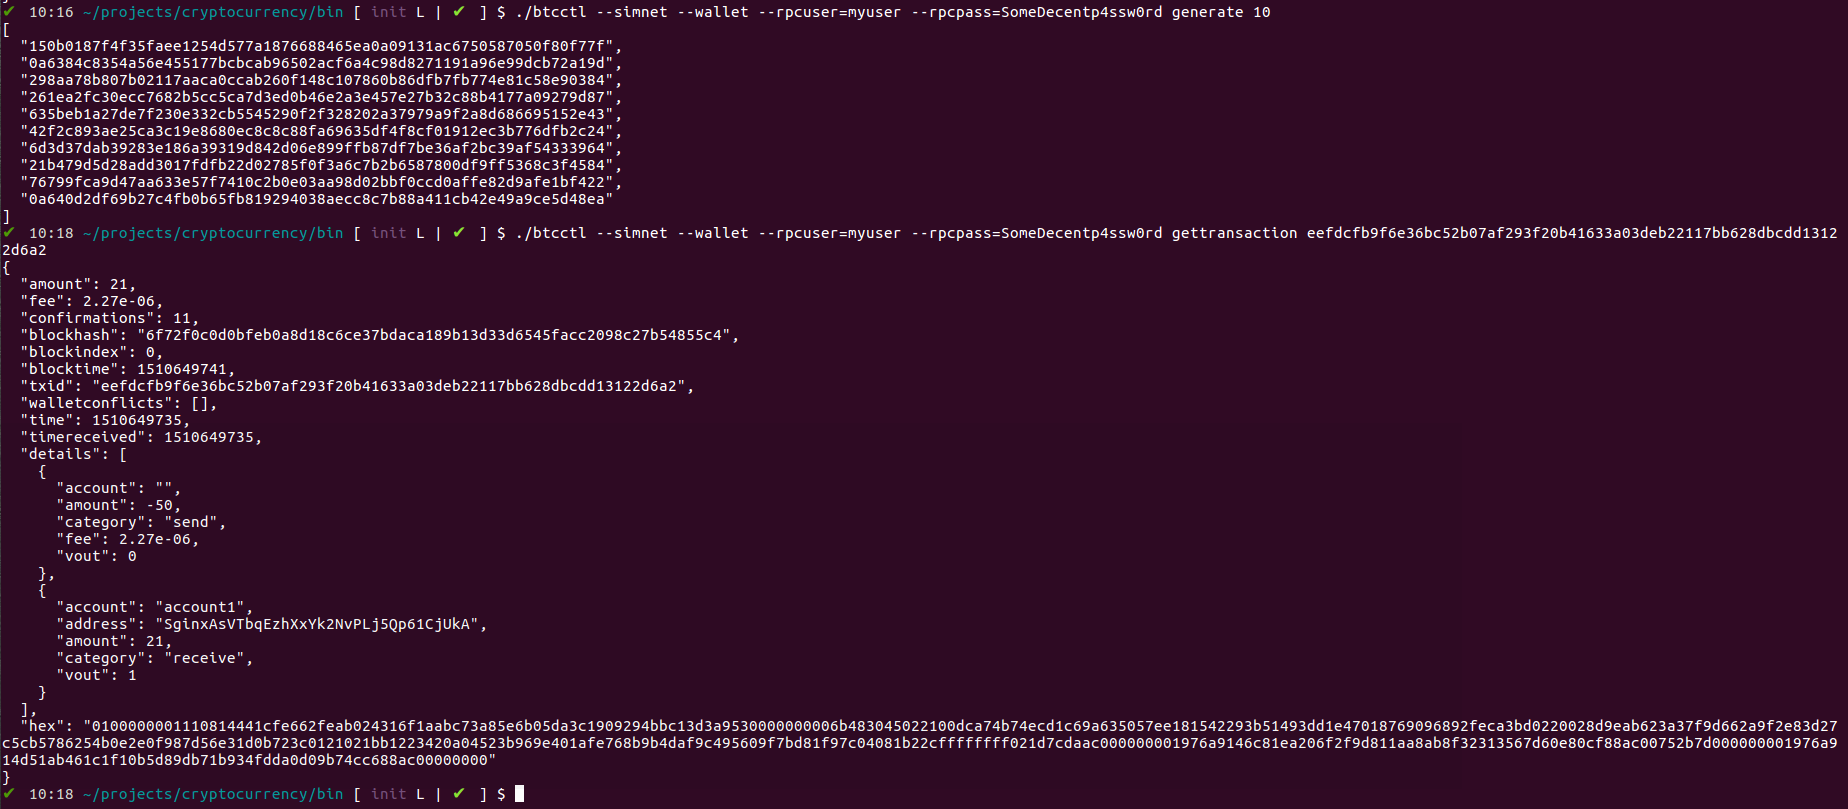
Now, with this number of confirmations, the transaction can be marked as done.
What comes next ?
We went through the installation process of a development environment — starting from installing the btcd and the btcwallet, setting up the SimNet and transferring Bitcoins manually from one wallet to another.
In the next article, I will demonstrate how to integrate the payment flow and automate the process of listening to the blockchain with a PHP application.
If you want to read my next article about integrating PHP application with the Bitcoin payments, please subscribe to the newsletter.
What's your thoughts?
Please Register or Login to your account to be able to submit your comment.